This blog is built by the Hugo static site generator and hosted by Render, along with a number of other sites I maintain with an identical deployment. Before joining Render and discovering how freakin’ slick it is for hosting static sites, I had massively over-engineered my own patchwork solution.
I had built a Zastava Yugo from spare parts when I could’ve just called an Uber.

This article contrasts two approaches to deploying this blog:
- A custom-built Rube Goldberg machine that Eric Fritz was able to build in a cave with a box of scraps, and
- A general solution available from a suitable hosting provider that offers the right feature set.
If you’d like to skip my life story and just go to the damn recipe, you can click here to see the configuration of this blog’s infrastructure as it exists today.
The “old busted” solution
At the time I first set up the patchwork infrastructure for this blog, I was deep into a few personal projects. The most complex one was a continuous integration system that required elastic container-based compute for build jobs. To avoid going full-tilt on AWS or GCP, I chose to host a minimal Kubernetes cluster on Digital Ocean. This cluster cost only a few dollars a month, and I was reasonably certain that I wouldn’t be caught with a surprise bill if the elastic band holding my compute in place happened to snap. This was a real fear and point of friction when considering one of the larger Cloud providers.
Human concentration is finite and Cloud platforms tend to be sticky. Thus, I began to iterate on a solution to host this blog using the tools already within reach. This blog was by far the simplest project of the bunch. Other projects required long-running API backends, event queues, databases, and access to the Kubernetes control plane to schedule user workloads.
The deployment of a static site was slotted into this existing stack as lazily as possible. Finding a more ideal solution would’ve required looking into other unfamiliar tech, and that would have required me to spend focus that I wasn’t willing to pay.
Choosing a tech stack
In addition to a small Kubernetes cluster, I had a small handful of Droplets that hosted several API servers. These machines were configured with Ansible, a product I’d be happy to avoid for the indefinite future. I was considering Chef solo as an alternative option, by recommendation from a coworker. I didn’t get very far in building a mental model of that tool mostly due to a lack of consistent analogies in its pun-based command set. How do you knife a server - WTF is even that?!? I stuck with Ansible as it seemed like the milder of the two headaches.
Reflecting on my experience so far, I wouldn’t attempt to run anything non-trivial on bare virtual machines again. My updated go-to solution would be to provision the actual compute via Terraform, and run everything in Docker. This would allow me to work on an abstraction layer consisting of container images. After all, why ship raw source code when you can ship fully executable environments? I’ve become much more accustomed to a deployment that falls on the cattle side of the cattle-pets spectrum.
My provisioning needs at the time were to log (read: save in Git) and have the ability to replay machine setup (read: nuke and rebuild). All of the fiddly installation and configuration steps mustn’t be re-learned in an emergency situation where I have to start from a freshly provisioned virtual machine. Ansible filled this gap and enabled decent automation of the following tasks:
- Installing a web server, and its dependencies.
- Registering the web server with an init daemon so that it would run on startup and restart after crashes.
- Configuring the web server to serve the correct content based on the requested domain (using vhosts). This configuration must be kept in version control so I could easily amend and re-apply it as I Pokémon’d an ever-increasing number of side project domain names. I’d argue that I’m not a hoarder and my ambition simply manifests itself non-linearly!1
- Obtaining and refreshing HTTP certificates for multiple domains via Let’s Encrypt and certbot. If I had attempted this before I knew of certbot I would’ve thrown in the towel after five minutes of futzing with certificate authorities. There’s not nearly enough time in a human life to spend any amount of energy on that nonsense.
To host image and binary content, I reached for Digital Ocean’s Spaces. The objects stored in Spaces’ buckets were managed via manual upload, outside of version control, and therefore did not have the benefits of rollbacks. The introduction of object storage came from the “best practice” knowledge that Git was an inappropriate place to store binary file types. Lest the bad things occur. What bad things? Couldn’t tell you as I never actually experienced them myself. The introduction of LFS support has since blew away that intuition.
Massaging the stack
Spaces allow you to configure a custom subdomain, but it doesn’t seem that it lets you serve from the top-level. I could host assets.eric-fritz.com or blog.eric-fritz.com, but eric-fritz.com could not be hosted directly. Thankfully, I already had web servers provisioned for APIs of other projects. And with this web server I would have sufficient control over the domains I’m serving.
The configuration for my web server (nginx, specifically) looked something like the following. Each domain followed the same template, differing only in server names, certificate paths, and the target path within the (shared) bucket. Here, the proxy_pass directive instructs the web server to fulfill all requests by serving a matching file from an upstream server. Specifically, I’m targeting the files under the blog/public/ directory of the laniakea2 bucket.
| |
Unfortunately, this setup turned out to be incredibly slow. This was in 2019, only a few months after Spaces were available in SFO2, the region containing my web server. I’m sure that content delivery latency has gotten much better over the past five years, but at the time it wasn’t a tenable solution to read files from the bucket for every request.
I attempted a little cache trick where a copy of the file is stashed on the web server’s disk whenever it is read from the bucket. This cached file can be served on subsequent requests for some (short-ish) period of time. This has an advantage over using only cache control headers as the cache entries are shared over many clients. This reduces the total amount of traffic to the bucket and allows one reader’s fetch to decrease the latency of the next reader. Sharing a cache is possible to do since there’s no distinction on my blog between personalized and un-personalized content - every client is served the exact same content, and all of it is maximally cacheable.
To implement this trick, I was inspired by tips I found on “microcaching”. I believe this is a popular technique used for WordPress-like sites. Usually, entries are cached for 1-2 seconds. In this setup, I’m caching entries for up to an hour and applying some additional tricks (which I’ll get into more below). I won’t claim that this is a direct implementation of microcaching - just loosely inspired by it. An hour seems too long to be able to use the micro unit prefix in good conscience.
Adding caching to the nginx configuration required fairly minimal changes:
| |
- The
proxy_cache_pathandproxy_cachedirectives define an on-disk cache of up to ten gigabytes. This directory could fit the entire rendered website comfortably, including rendered content as well as assets. This cache will serve cached files for up to one hour after they are initially fetched. - The
proxy_cache_lockdirective ensures that at most one request to the bucket is made for a particular file at a time. If two requests for the same file are being served concurrently, the latter request will queue behind the in-flight request and end up using a newly populated cached version. - The
proxy_cache_use_staledirective lists a series of conditions under which a version in the cache older than an hour can be served. For the most part, these conditions indicate an error with Spaces. This allows the site to be served from the cache when the source of truth is otherwise non-functional.
These settings improved the perceived speed of the site to an adequate level. There remains a small “cold start” problem when the first visit to the site after an hour of inactivity has to repopulate an expired cache. To fix this, I could pull the ol’ AWS trick and jerry-rig a CloudWatch cron job to ping my Lambda function every page of my website to keep everything hot. But at this point there are diminishing returns on these types of solutions.
It’s a blog, for gosh sake. If anyone really requires my thoughts on monads with consistently low latency, I’ve probably built the wrong audience.
Fabricating a deployment process
Alright, so I’ve got a web server provisioned and serving the correct content. I’ve got a functional caching solution. I’ve registered an object storage bucket for the content of my blog. The next step is to figure out how to easily take the blog content (minus binary assets) from Git and move it into the bucket to be served.
I’m not a fan of Click Ops, and drag-and-dropping content via a GUI leaves me with shaky confidence that I selected the correct files. I’d sleep better at night knowing that I could run a shell script that would perform that operation in a repeatable, consistent manner.
Thankfully, the build itself is minimal and easy:
| |
At last! A piece of this adventure that just does a thing! It doesn’t require days of learning edge cases and trial-and-erroring flags to get non-deranged output. I’m looking at you, Ansible tasks vs handlers vs roles vs plays vs playbooks.
The hugo command bundles all of the markdown content and binary assets of my static site into a public directory that can simply be rendered by a browser. The next problem to tackle is moving this public directory into the bucket.
Because I’m using Spaces, a re-implementation of the ubiquitous AWS object storage API, I’m able to re-use existing tooling designed for uploads to S33. Unfortunately, these tools don’t follow the spirit of convention-over-configuration. I found myself back in the land of explicit flags and having to care (or at least learn) about the tool’s every minutiae.
The deploy.sh script is shown below, in which AWS credentials are written to a temporary file and some rather specific S3 commands are invoked.
| |
This script cleans the slate by deleting all existing objects under blog/public, then copying the local public directory in its place.
Along the way to the final version of this script, I ironed out a content-type mismatch with stylesheet resources. Some combination of Spaces+nginx+Chrome was NOT happy with the default content type for these resources and refused to apply any styling at all. I didn’t want my blog to look like a page designed by Warren Buffet. Fixing this required recursively modifying all *.css files with a specific Content-Type header.
Now I have a working deploy script. It updates the content of the bucket. But, due to caching in nginx, it does not update the content users are served. This was a bit of an annoyance. I’d like to forcibly bust the content of the cache whenever new content or assets are available, and let the cache ride as long as possible otherwise.
But worry not! I have a script for that as well!
The bust-cache.sh script is shown below, in which I walk every file in the local public directory and hit my nginx server with a special X-No-Cache header. This header causes a re-fetch of the file from the upstream server and purges the stale version from the user’s view.
That’s at least how I understood this header to interact with the proxy cache feature of nginx. And I believe I had empirical evidence to reinforce this mental model at some point in time.
| |
Putting this all together yielded the following GitHub Action workflow. This workflow updated my website on all pushes to the master branch in Git. Once I threw my work upstream, my robot butler would build, publish, and update a remote cache on my web server. Then, my job was to sit back, relax, and watch Google Analytics skyrocket.
| |
The Rube Goldberg machine has been constructed and running for some time without major incident. Until one day it blew the hell apart and cache busting no longer worked correctly. Or maybe it never actually worked and I built an incorrect mental model from coincidences. Either way, I couldn’t find the energy to troubleshoot what was wrong.
It was time to disassemble the machine in favor of a simpler mechanism.
The “new hotness” solution
I joined Render as an engineer on the Datastores team in October of 2023. It was the night before my first day on the job. I was sitting on the bed of a San Francisco hotel room with an order of Karaage from the restaurant next door and wasn’t in the mood for Netflix. Not yet having taken a deep dive into Render’s product, I thought it might be a good time to perform the obligatory “move all my personal services to this platform” dance.
I thought I’d hit a snag or at least come away with a list of product improvement suggestions to present on my first day. But creating a service that could fully replace my old setup was incredibly simple:
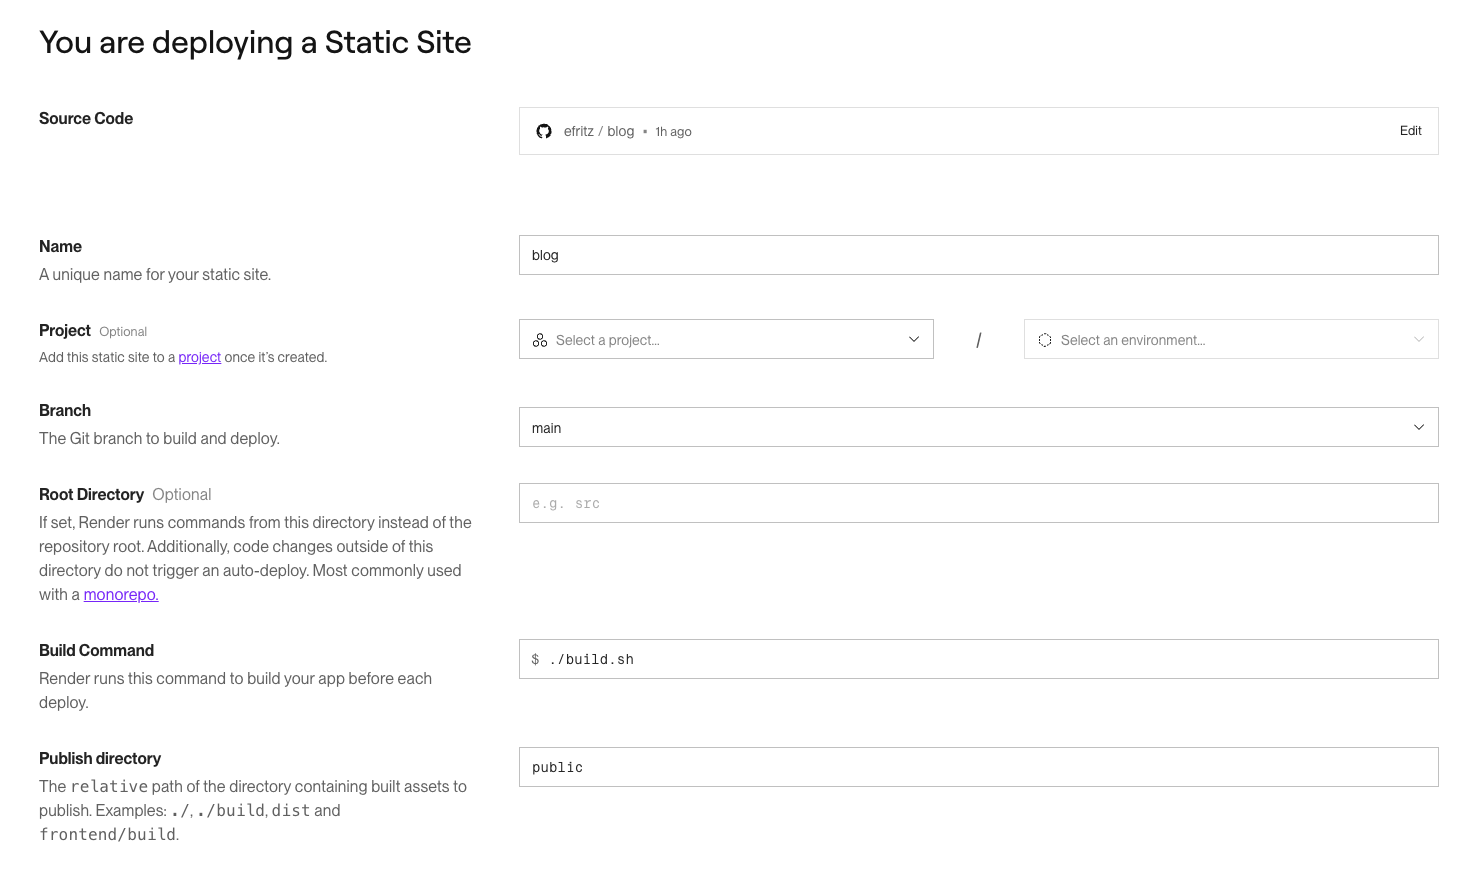
It took like 20 minutes to migrate everything, including changing the DNS records and waiting for them to propagate through public nameservers. The majority of the time was actually me fiddling around on gandi.net trying to figure out where the DNS record pane for my domain was in their UI. I kept getting confused by banners trying to upsell additional services and going to the wrong page.
Registering a custom domain was also incredibly easy:
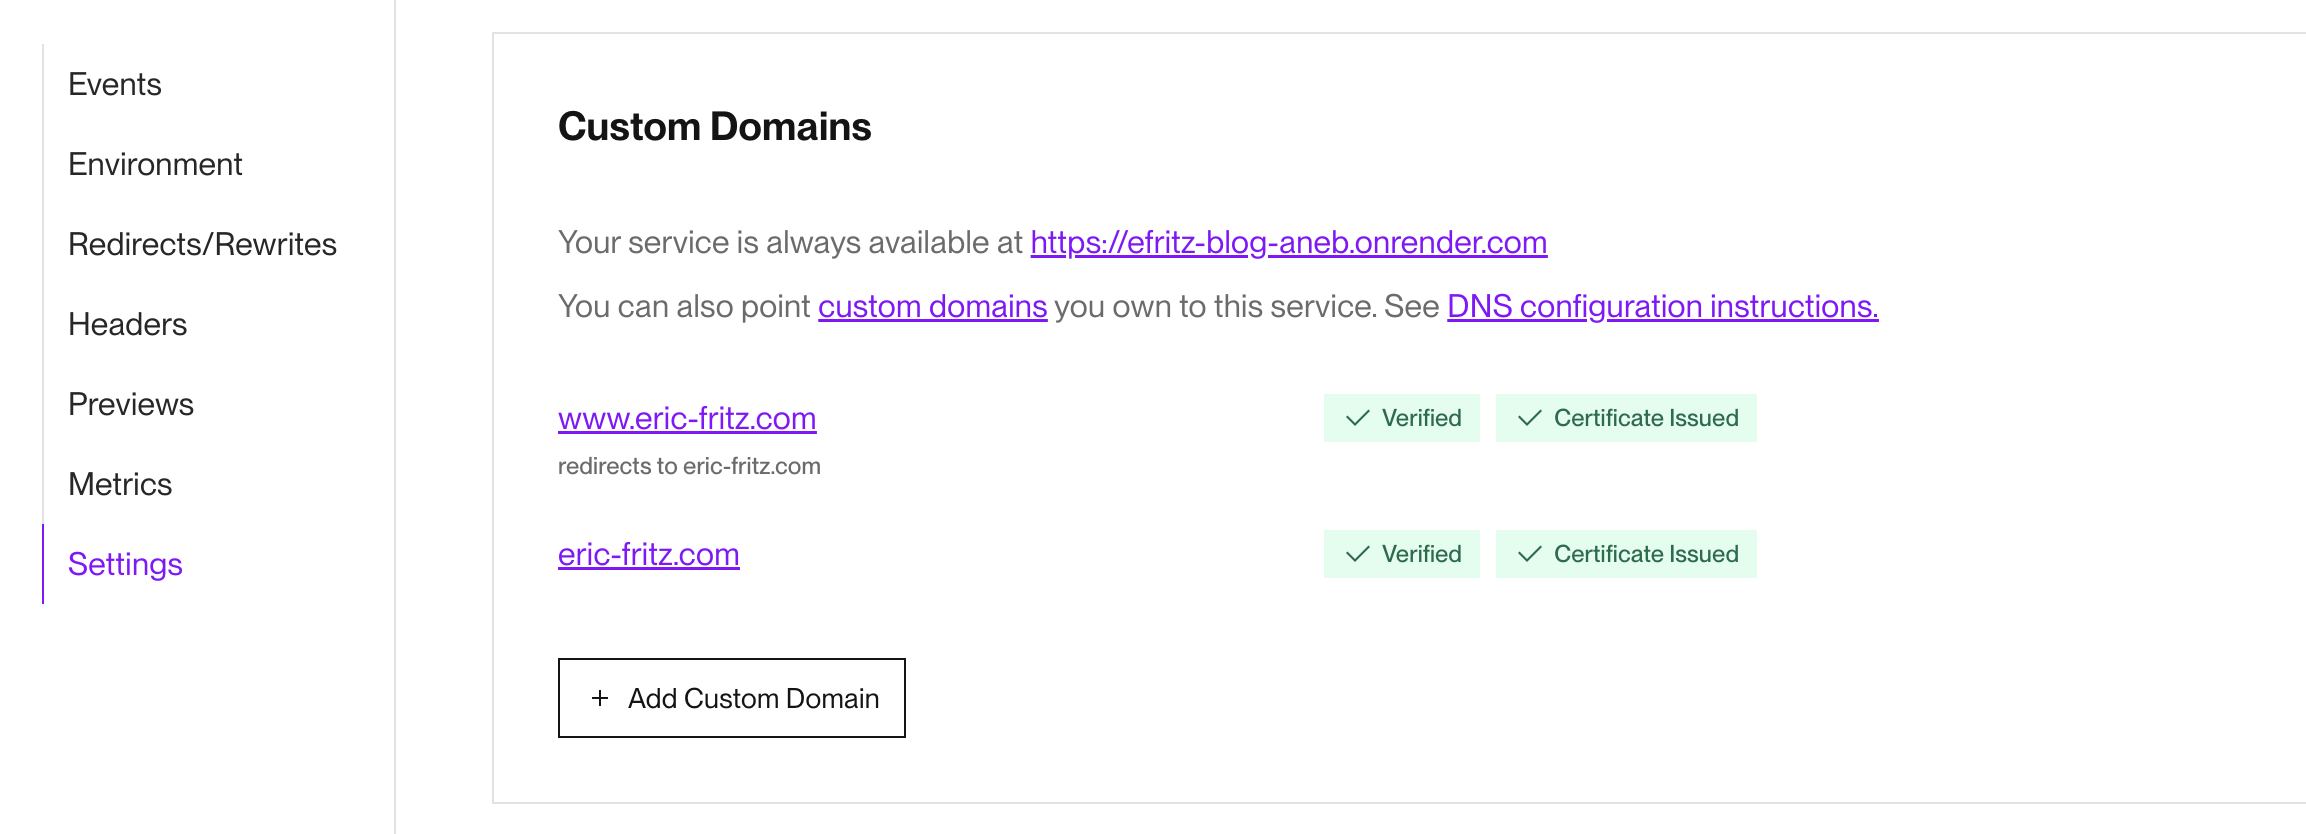
I literally watched the “Certificate Issued” and “Verified” badges go from loading indicators to a success state before I was even aware all of this was fully automated on the Render side. Certbot had lowered the barrier of entry into the world of certificates enough for me to clumsily climb over it, but I was not prepared to receive this level of concierge service.
Configuring this single static site service had replaced a huge portion of the old stack that I built through the blur of frustrated tears, including:
- Virtual host configuration
- Registration of SSL Certificates
- Unnecessary microcaching
- A (now recently broken) deployment pipeline
I then learned about Render Blueprints and began to salivate at the thought of ejecting Ansible from my life as well. The following file is the complete Blueprint configuration that replaces over 300 lines of existing Ansible configuration / Jinja templates.
| |
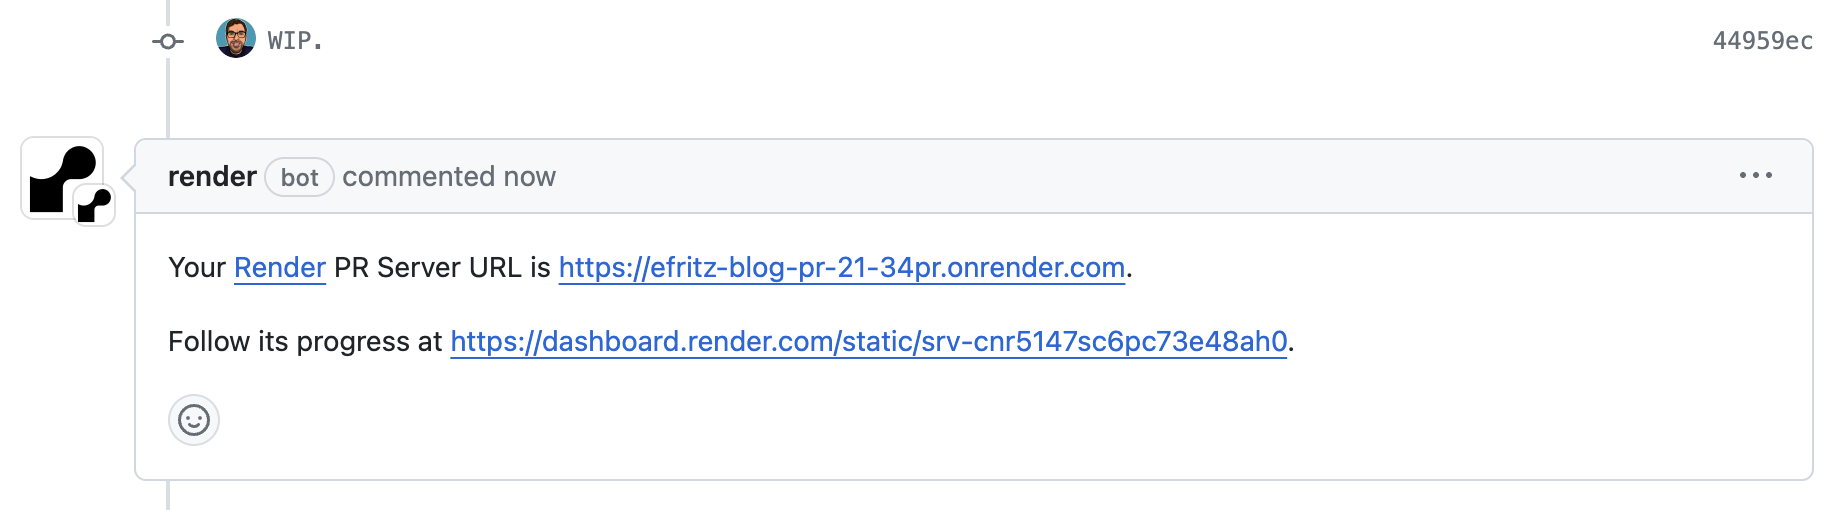
And this minimal config comes with a killer feature that my previous stack lacked: enabling pull request previews. A boolean flag in the YAML above adds the ability to build a complete clone of my blog for every open pull request.
Previously, if I wanted to share a sneak-peek of content to some audience before publication, I would have to send them a link to the raw markdown file. Or, more presumptively, ask them to build and run the entire site locally. With pull request previews, I get a unique .onrender.com URL resolvable by anyone that I can send out for feedback within a minute of pushing to my repository.
My over-exuberance for hard-coding the eric-fritz.com domain name into asset paths caused a small snag. This meant that although the content would be built into the preview, it would still try to pull images and stylesheets from whatever the live version was hosting. This would cause new images to break and changes to styling to be omitted from the rendered preview. Thankfully, this was an easy fix with a small amendment to the build script:
| |
When Render is running the build command, it injects some useful environment variables including the external URL which will eventually be served. This script replaces the hard-coded domain to be the target preview domain when building from a pull request.
Reflections
After replacing so much of the ad-hoc hosting setup I’ve accrued over time I honestly feel lighter. There’s less debt holding me back from dealing with this repo, and I think that’s a non-insignificant reason I’ve been able to write more this year than I usually have. Knowing that I can deploy without some irrelevant technical issue popping up has lowered the activation energy of producing content and increased the velocity of my writing.
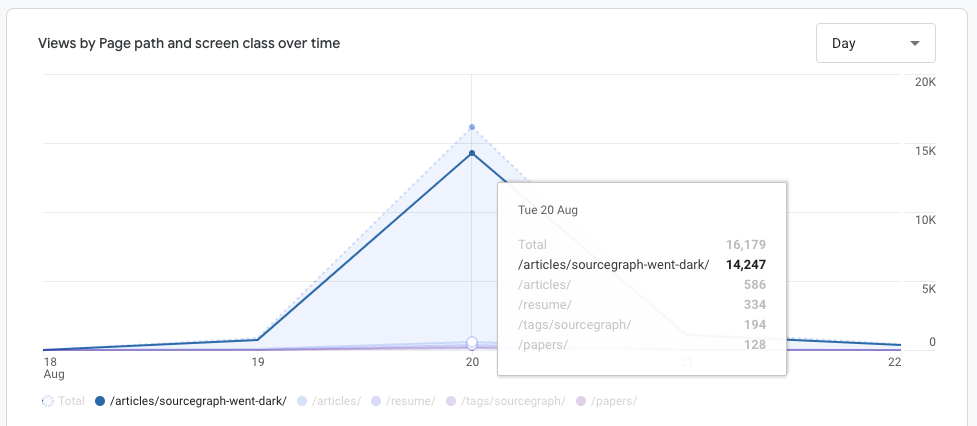
I’ve also discovered that I can accidentally4 land on the front page of Hacker News without having to worry about fending off a hug of death by patching a live Droplet.
Once AGI arrives, all side projects will be immediately completed. ↩︎
I was naming servers after high-intensity stars and buckets after galaxy clusters. I had a theme going! ↩︎
PeRfEcTlY dEsIgNeD (zErO nOtEs, CoUlDn’T dO bEtTeR iF I tRiEd). ↩︎
I wrote a post about rewriting dead links on my blog but gave it a spicy title and started a flame war. ↩︎